Wednesday, May 25, 2011

What we are working on Wednesday!

Two new patterns hitting the shop & website TONIGHT - The Amelya Dress & Lily Halter Dress!
You have to wait until they go up to see those though! 

But we will show you the new SKIRT that we are working on!  
We are hoping to have it up by the end of the weekend!


Yes, it takes TWO lollipops to get Harper to smile even for one of her favorite people, Kaylee!
(Kaylee is our super fabulous photographer who you can find here).  

So that is what is the works right now! 
If you would like to stop by and entertain my kiddos so I can finish sooner, I would not turn you down!

Sunday, May 22, 2011

We have a winner!

According to random.org...

Andi

is the winner of the StitchnStash Fabric Giveaway!

Congratulations!!

Please message me at sewsweetpatterns@gmail.com and I will forward your info to Julie at StitchnStash!

And of course, we would LOVE to see pictures of what you make!

Friday, May 20, 2011

Pillowcase Dress Tutorial!

If you are like us, you seem to have a stash of  pillowcases that you have somehow collected over the years.   We have been giving some of our favorite cases a new life lately by turning them into dresses (mostly for Harper...we need some more girls in this family!)  So we thought we would share a little tutorial with you for these sweet Pillowcase Dresses.


First you need to download the {free} pattern by clicking here.

Once you have downloaded it and cut out the desired size, we recommend you read over all directions before you getting started.  Here are the steps:

1.  Start with a pillowcase-it doesn’t matter what size.

2.  Iron it flat, then cut off the top 1/2 inch.

3.  Fold so the front center is now the right edge. 

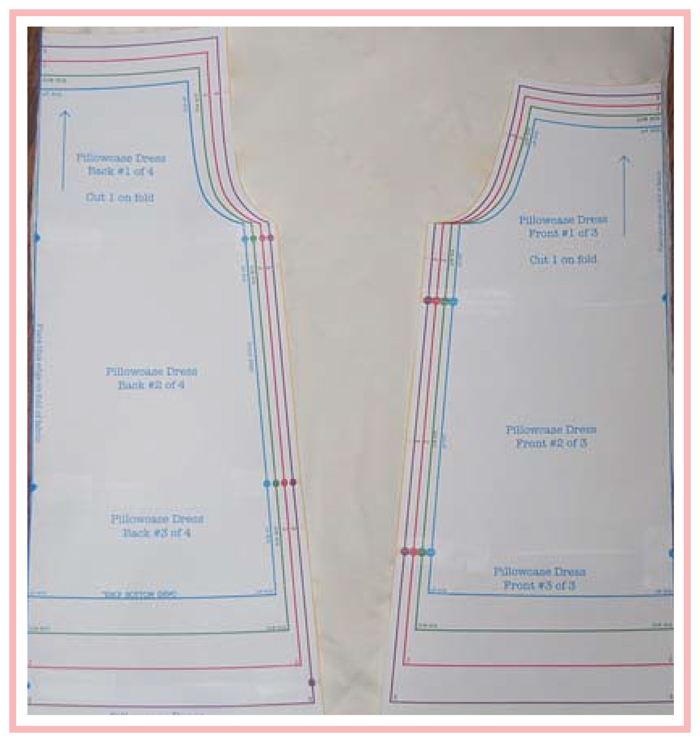
4.  Place front pattern piece so the center front is on the decorative front part of the pillowcase.
The back pattern piece center front should be on the opposite fold.

5. This is what the pieces should look like after cut and unfolded. 

6.  Put right sides together so the inside is now the outside and sew together
at sides with a 1/2 inch seam allowance

7.  Trim seam allowance to 1/4 inch and finish with a zig zag or finishing stitch.  

8.  Turn raw edge of armhole under 1/8 inch and then 1/4 inch and topstitch.
Take it slowly to keep it smooth and even.

 9.  Another picture showing what the armhole should look like.

10.  Fold raw edge of the neckline down 1/8 inch and then 
1 inch and topstitch, creating casings for the ribbon.

11.  Pull ribbon through the casings, with ends meeting on one side. I use a loop turner
to pull it through, but you can attach a safety pin to and feed it through.

12.  You are finished!!

There you go!  Your sweet pillowcase has a happy, new purpose! 

Wednesday, May 18, 2011

StitchnStash Fabric Giveaway!

We are so excited to team up with Julie from StitchnStash for our first fabric giveaway!

The winner of this giveaway will receive a shop credit good for one yard (or two 1/2 yards) of fabric and shipping to anywhere in the U.S (international shipping not included, but you can still win the fabric).  

Here's how you enter: (Please make sure you are a public follower of our blog to enter)

1.  Visit StitchnStash and come back here to leave a comment on what fabric you would chose and what you would make if you won!

2.  You can receive a second entry if you make a purchase at StitchnStash.  You can use code INSTICHES to receive 10% off your purchase.  Just come back here and tell us what you purchased!

3.  Blog about this giveaway and link it back to us and you can receive a third entry.

(leave separate comments for each entry)

Giveaway ends Saturday night at Midnight PST & the winner will be announced Sunday morning!

Good Luck!

Wednesday, May 11, 2011

The Lowdown on Sewing Machines!

We are often asked what kind of sewing machine we recommend.  Buying a sewing machine can be overwhelming, with the price range of current models ranging from $70.00 to $2,000!  I, {Patti}, will try to shed a little light on the choices available.

There are 4 main types of machines available:

1.  Mechanical machines are the simple machines using the technology that has been around for years.  They use knobs and levers to change and adjust stitches.  They are pretty basic for a beginner and reliable, but you will be limited and you may regret it in the future.  They usually don’t have a buttonhole feature.           

2.  An electronic sewing machine has more features than a mechanical, such as buttonhole features and some decorative stitches that can be accessed by pushing a button.

3.  A computerized sewing machine has a wide selection of stitch patterns, designs and even monograms at the touch of a button.  Some of the more expensive have the ability to connect to the computer, transferring your own designs from computer to fabric.

4.  A serger or overlock machine sews, trims and finishes the fabric at the same time, making a professional looking seam allowance. If you are going to be sewing with knits a serger will make it easier, but you will need a regular sewing machine for buttonholes and zippers.

I have the Brother XR9000 computerized machine.   It has the features I was looking for and the price was great.  It is quiet and smooth and buttonholes take about 30 seconds, by placing the button in the pressure foot.  I have done some simple monogramming and some of the 120 decorative stitches and after a few tries got great results.

Your choice has a lot to do with your budget and what you think you will be doing with your machine, but my recommendation would be to get the best machine you can afford, but we don't recommend just going with the cheapest. 

Hope that helps answer some of your questions about sewing machines!

Saturday, May 7, 2011

And the winners are...

Good Morning (or good afternoon to most of you!)


The contest has ended and all of our followers have been entered...


The winners (who were chosen randomly) are....


 Kristina Busenitz - the winner of the 10 pack of patterns!

Tammy Propst & Susan Poplin Barclay - the winners of the 5 packs!!

Send us an email at sewsweetpatterns@gmail.com to tell us which patterns you would like us to send you!

Thank you so much to all of you who have celebrated with us this week!  We are thrilled to have you all following our blog and we look forward another great year!

Hope you all have a Happy Mother's Day!

Friday, May 6, 2011

Tutorial #1- Putting pattern pieces together

For our first tutorial, we thought we would layout the easiest way we have found to put the pattern pieces together.

1.  Print out pattern pieces following the printing instructions:
When printing pattern pieces, make sure that “page scaling” is set to “none” and “auto center and rotate” is checked.  Pattern pieces print on 8.5” x 11” paper (with the exception of The Harper Dress pattern which prints on legal sized paper.  We will be changing that to print on letter sized soon!)

2. Cut out pieces around the largest size (In this example, we are using the Sophia Tunic pattern and cutting out a size 3T).


3.  Tape piece number #1 of 4 to a window.


4.  Holding piece  #2 of 4 over piece #1 of 4, overlay dots and tape the pieces together so the dots appear as one.


5.  Place piece  #3 of 4 over piece #2 of 4, overlaying dots so they appear as one.  Tape.


6.  Place piece #4 of 4 over what you have so far, matching dots on piece #3 of 4 and piece  #2 of 4.  Tape.


7.  Now cut out the entire pattern to the size you want.  You can keep the sizes you cut off to tape on later, or you can reprint the pattern for next time!


8.  Repeat steps for back of tunic and sleeve. This is what the pattern pieces should look like.  Now you are ready to cut the pattern pieces out of your fabric!


Happy Sewing!

Wednesday, May 4, 2011

What we are working on Wednesday

Happy Wednesday!

Wednesdays are Mommy & Me preschool day for Asher and me!  It is so nice to get to spend some time with just him (Since Asher & Harper are 16 months apart he never really had much time alone!)   Harper gets to spend 3 seriously FUN hours with "Gogo".  She usually comes home fairly dirty and full of candy.  Isn't that how you are supposed to come home from your grandma's house??

How do you spend your Wednesdays?

We thought we would take Wednesdays to give you a preview of the new patterns we are working on.  Some weeks it may just be a description cause we are still in the early developing stages and other weeks it may be a completed pattern that is just about to hit the website.

This week we have two almost finished patterns to share with you! 

The first is my new favorite...The Lily Dress.  It is a full, two-tiered skirt with a gathered, straight bodice and thick halter straps. 

The second is my other new favorite (every new one is my favorite until the next new one).  It is a full skirt with a rounded neck bodice and small capped sleeves.  Then we added a thick fabric tie that goes all the way around the dress and ties with a huge bow in the back.  I think it has a bit of a vintage feel, especially when you use coordinating floral fabrics.  I think this one will be "The Ameyla Dress".

No pictures yet since my mom gave our only pro-types as gifts at a baby shower this weekend!  There were a big hit!

So those are two of our upcoming patterns!  Knowing my mom (who has a never ending supply of designs spinning around in her head), there are MANY more to come!

Tuesday, May 3, 2011

Pattern Giveaway!

To celebrate our 1st anniversary, we are doing our first giveaway!

We will be giving away...

One TEN pack of the child patterns of your choice (a $70 value)!

And two FIVE packs of the child patterns of your choice (each a $35 value)!

Here is you enter...
1.  Sign up to follow our blog!
2.  Follow us on Facebook!

That's all!

We will close the giveaway Friday night at midnight PST and announce the winners (who will be chosen randomly) Saturday morning!

 Looking forward to seeing who the winners will be and which patterns they will pick!
 

© 2011. All Rights Reserved. | Custom Blog Design By Penny Lane Designs