Hello! Remember us?
It has been a busy summer! We have been away on multiple vacations and in between those we have been working hard on four new dress patterns!
So we are long over due for a new post and thought we would start back today with a tutorial!
Lately, we have been getting a few questions about how exactly to complete the placket that is found in the Kylie, Goldie, Raven and Isla Dress patterns.
Lately, we have been getting a few questions about how exactly to complete the placket that is found in the Kylie, Goldie, Raven and Isla Dress patterns.
The word “placket” comes from the Old French plaquer, which means “to lay on,”
During stressful sewing occasions it has been called other things, not appropriate to put into print!
During stressful sewing occasions it has been called other things, not appropriate to put into print!
I will simplify plackets for you so they won’t be so intimidating!
A placket is a made on a slit in a dress or shirt is intended to facilitate putting on and removing clothing, giving a nice, clean appearance to the slit made. We are used to seeing plackets in shirts, especially men's shirts, above the cuff, or on skirts that have a button closure at the waistband.
A placket is a made on a slit in a dress or shirt is intended to facilitate putting on and removing clothing, giving a nice, clean appearance to the slit made. We are used to seeing plackets in shirts, especially men's shirts, above the cuff, or on skirts that have a button closure at the waistband.
1. Cut a slit down the center back of the skirt (some patterns have a back seam- if so then the top few inches of the back is left unsewn. Fold down the slit so the sides form a straight line. The placket should be double the size of slit.
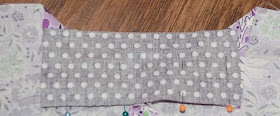
2. Put the placket face down over the turned down area and pin.
3. This is what it will look like from the skirt side. Sew across the top. The seam allowance of the skirt should be 1/2 inch at the beginning and the end, but in the middle it should be 1/8 inch.
4. Trim the seam allowance and clip the center of the “V” down to the seam allowance.
5. Fold the placket over twice, hiding raw edge of placket and covering seam allowance. Pin.
6. Topstitch placket. To hide stitches “stitch in the ditch” or sew right at the point where the two fabrics are attached. Just make sure that you are catching the inside (see next photo).
7. This is what it should look like from the inside.
8. Fold the right side of the placket under and stitch across the top, reinforcing by going back and forth.
9. This is what it should look like from the inside.
So hopefully that will help clarify the plackets section!
Have you seen the new "Flutter Skirt" pattern?
Thanks to Melinda from My2SugarPlums for providing the name!
Ok, back to work on our new patterns! Hoping to have them ready to go very soon!


Yay, glad to see you are back! And making more awesome patterns, can't wait to see them! :)
ReplyDeleteYour instructions were a lifesaver today. Thank you!
ReplyDeleteThis was so helpful! I'm pretty experienced but the dress I am working on goes together differently than any others I have done. I couldn't even figure it out with my Vogue Sewing Techniques book. Thanks!
ReplyDeleteOMG, this was so helpful. I tried following the directions that came with the pattern but they just confused me more. Glad I found this.!!! :)
ReplyDeleteThankyou! My pattern instructions made absolutely zero sense to me!
ReplyDeleteThankyou! My pattern instructions made absolutely zero sense to me!
ReplyDeleteI want to say thank you forequire your help with your blog. I was having trouble fitting the placket to a dress I am making so I went on Google to find out what to do and found your explanation and pictures very helpful.
ReplyDeleteThanks so much. I wanted to convert my toddler dress pattern from using a zipper to a packet and couldn't figure out exactly how to do it. Thanks!
ReplyDeleteMe exactly. I too wanted to change the zipper to a button placket on the bodice with a small opening with a placket on the bottom half of a romper I am making. I've been looking for days for this tutorial! Thank you!
Delete